Built, published and rolled out to your whole organization in about 30 minutes.
How it works: You create an agent in Microsoft Copilot Studio, add our instructions and best-practice skills, connect it to Ariadne via the MCP interface – and make it available to all users in Microsoft 365 Copilot and Microsoft Teams. Background and special cases: see the FAQ .
The screenshots in this article show the German interface – the steps below use the English labels.
What you need
| Area | Requirement |
|---|---|
| Ariadne | The add-on module “API / MCP” is booked and activated ( details ). |
| Skill package | Contact service for more information. |
| Licenses & credits | Copilot Studio access for you as the maker and Copilot Credits billing set up in your tenant – who needs what is summarized under Licenses & costs . |
| Microsoft admin | The Global Administrator role for approval and rollout (part 2). |
- Create & publish the agent – you as the maker · steps 1–8 · approx. 30 min.
- Approve & roll out – your Microsoft admin · steps 9–10
More information: User experience · Licenses & costs · FAQ · Troubleshooting
Part 1: Create and publish the agent
1 Open the new Copilot Studio experience
- Open copilotstudio.microsoft.com and sign in with your work account.
- Enable the “New experience” toggle in the top-right corner – or click “Try now” in the banner.

2 Create a new agent
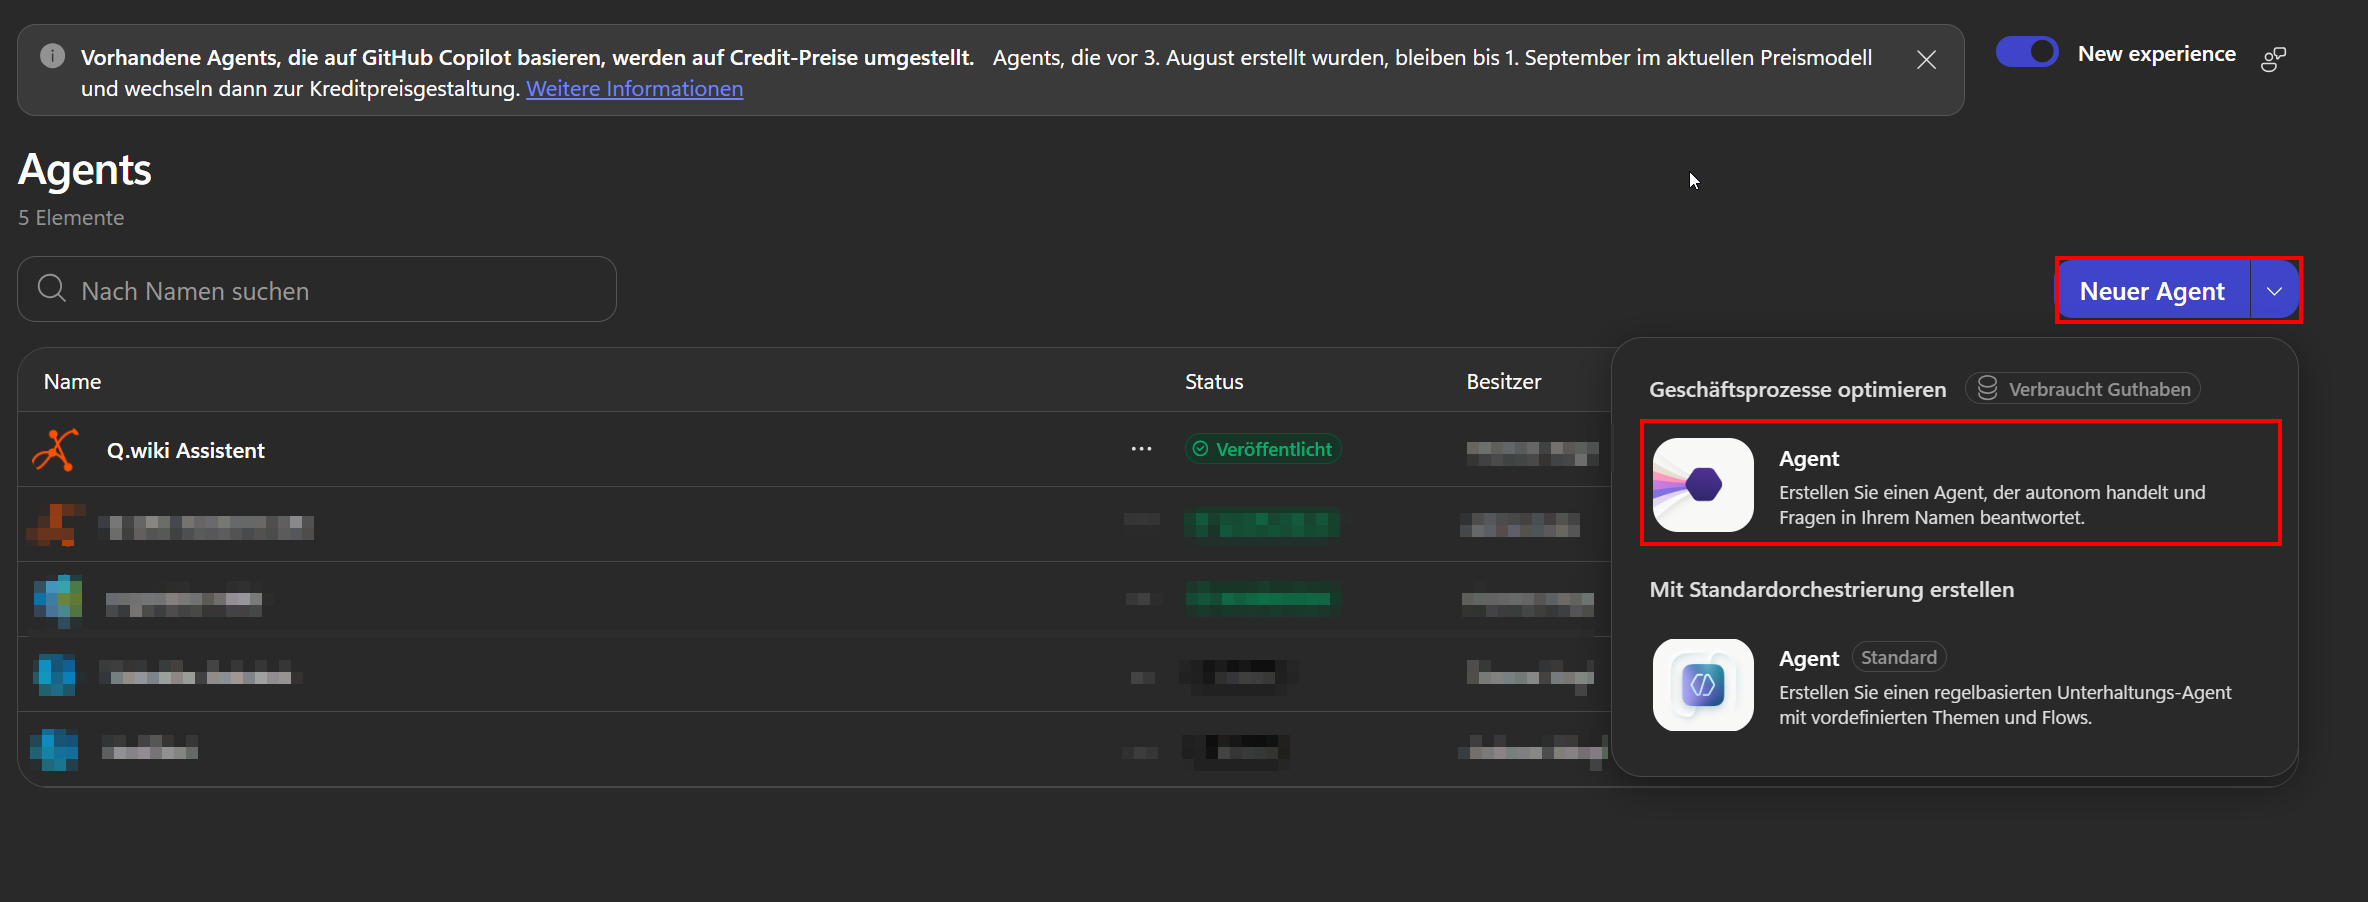
- Click “New agent” and, under “Optimize business processes” , choose the option “Agent” (labeled “Uses Copilot Credits”) – not “Create with standard orchestration” (the classic agent type).
- Name it
Ariadne Assistant.
3 Set the icon and instructions
The agent opens in the “Build” tab:
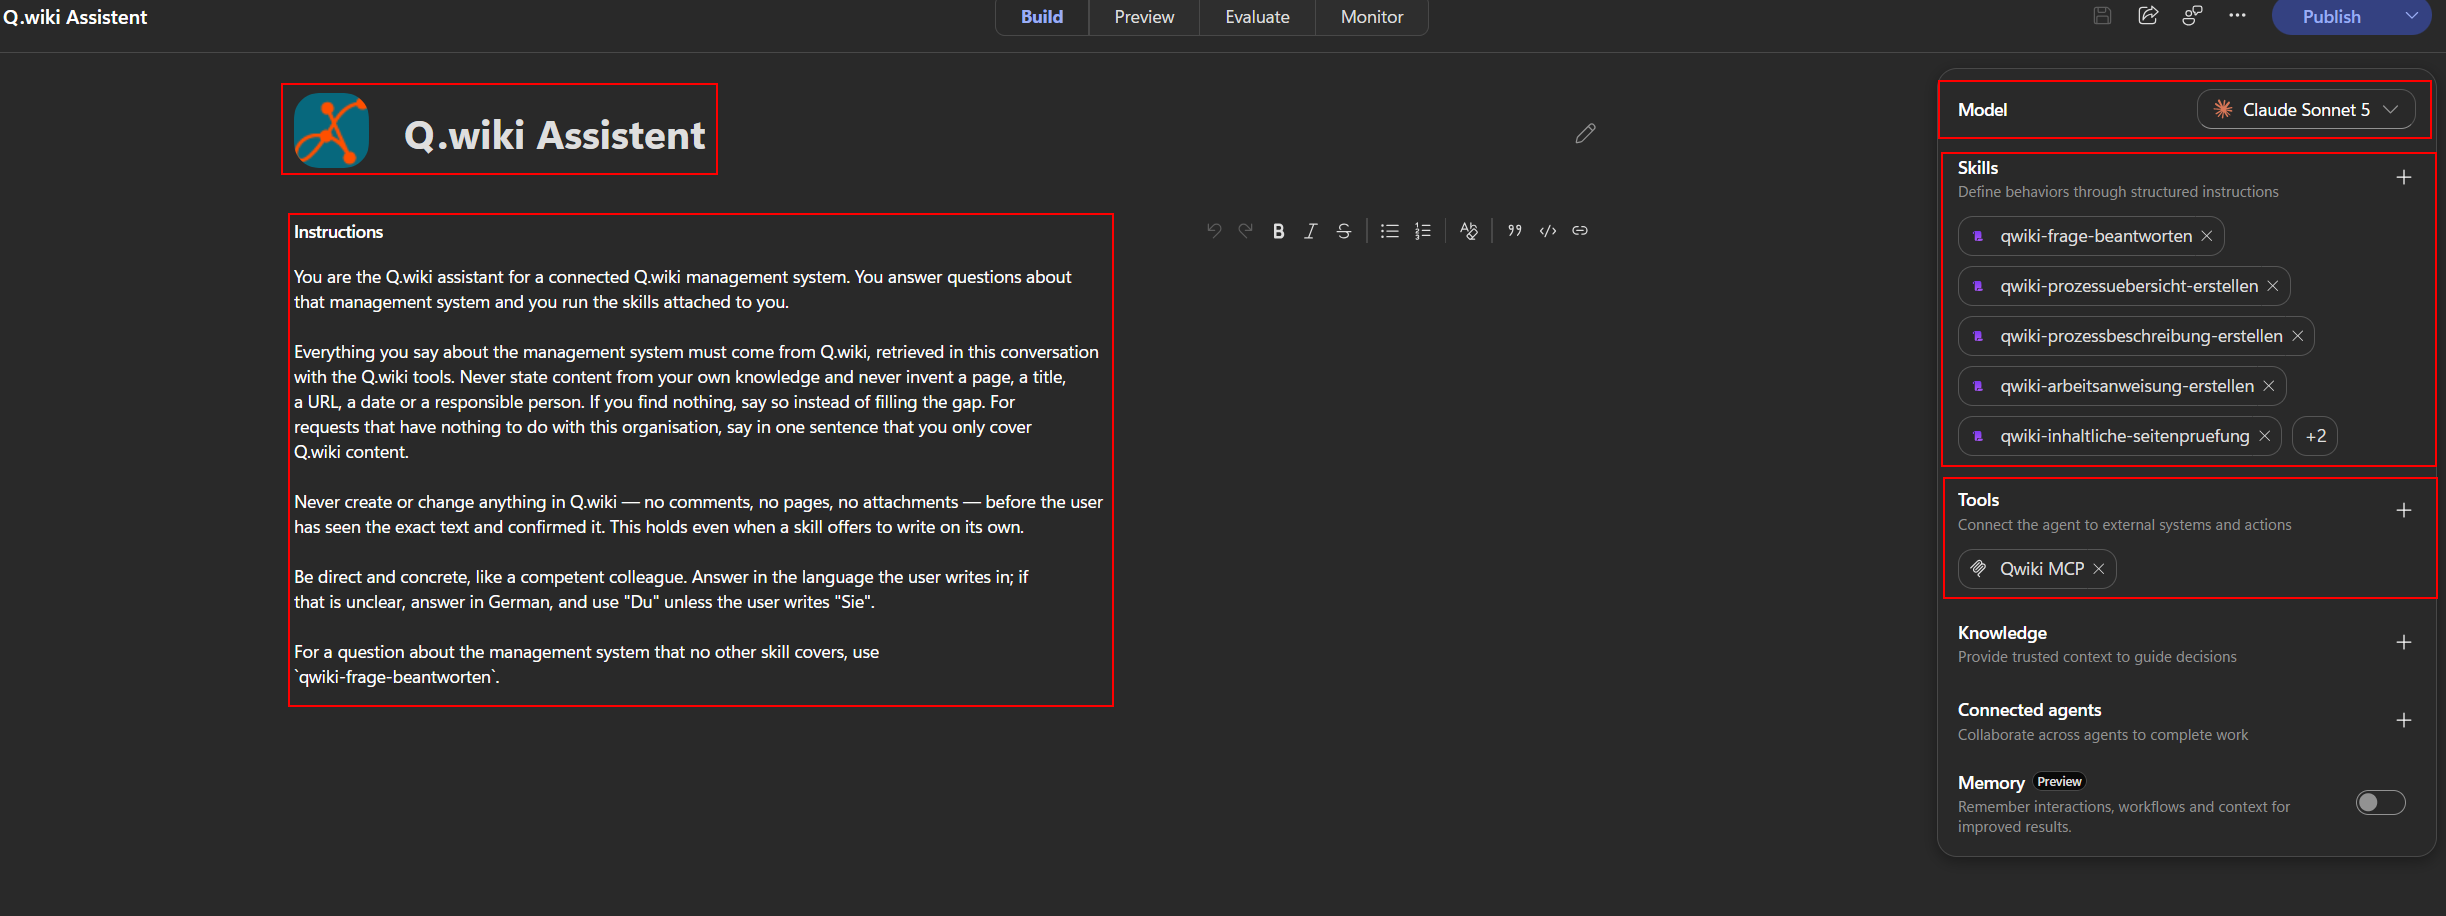
- Use the pencil icon (①) to set the icon – e.g. the bundled Ariadne logo from the attachments (
10-ariadne-logo.png) or your own logo (PNG, max. 100 KB). - Paste our proven instructions into the “Instructions” field (②) and save with “Save” :
You are the Ariadne assistant for a connected Ariadne management system. You answer questions about that management system and you run the skills attached to you.

Everything you say about the management system must come from Ariadne, retrieved in this conversation with the Ariadne tools. Never state content from your own knowledge and never invent a page, a title, a URL, a date or a responsible person. If you find nothing, say so instead of filling the gap. For requests that have nothing to do with this organisation, say in one sentence that you only cover Ariadne content.

Never create or change anything in Ariadne — no comments, no pages, no attachments — before the user has seen the exact text and confirmed it. This holds even when a skill offers to write on its own.

Be direct and concrete, like a competent colleague. Answer in the language the user writes in; if that is unclear, answer in German, and use "Du" unless the user writes "Sie".

For a question about the management system that no other skill covers, use `ariadne-frage-beantworten`.
4 Choose the model
In the “Model” section (③), pick a model and save. We recommend Claude Sonnet 5 – it is not mandatory, other models work as well ( details in the FAQ ).
5 Connect Ariadne via MCP
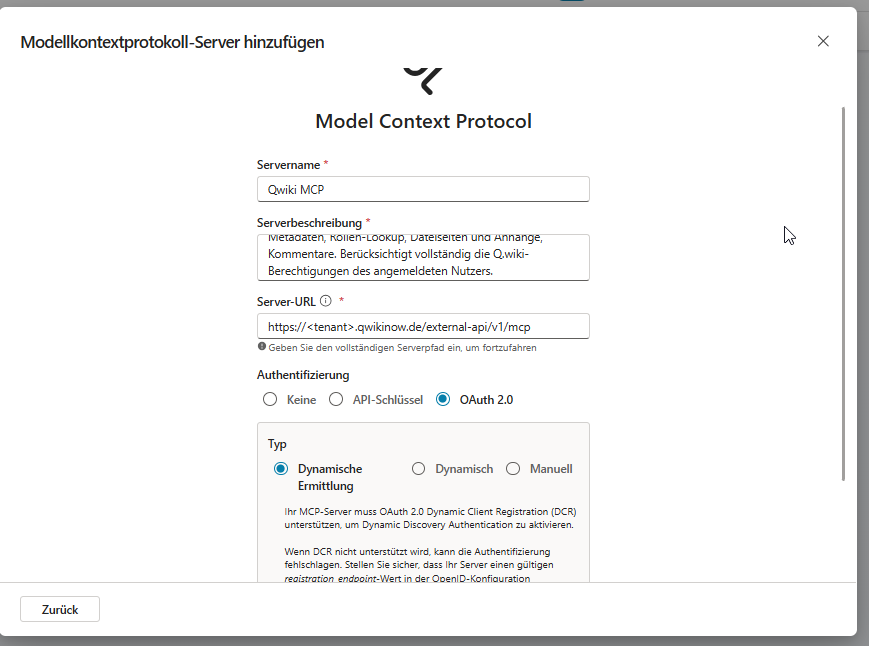
- In the “Tools” section (⑤) click + , then in the dialog select “Add” > “Model Context Protocol (MCP)” and fill in the fields:
| Field | Value |
|---|---|
| Server name | Ariadne MCP |
| Server description | Access to the process knowledge in the Ariadne management system – full-text search, page retrieval with metadata, role lookup, file pages and attachments, comments. |
| Server URL | https://<ariadne-name>.ariadne.cloud/external-api/v1/mcp – you’ll find your full URL in Ariadne under My account > My profile > Content API |
| Authentication | OAuth 2.0 , type “Dynamic discovery” |
- Confirm with “Add” and create the connection ( “Create new connection” ): sign in with your Ariadne account in the pop-up, choose the unit (your main unit if in doubt) – read access is sufficient.
- The Ariadne tools (full-text search, page retrieval, roles, and more) appear in the list – save with “Save” .
6 Upload the best-practice skills
In the “Skills” section (④) click + > “Upload a skill” and upload the skill ZIP files (You can contact Support for more information.) one by one, unchanged (do not unzip). The agent activates matching skills automatically – what each skill does: see the FAQ .
7 Test
- In the “Preview” tab, ask a real question from your day-to-day work, e.g. “How does our complaint handling process work?”
- Check in the “Activity trace” that
Ariadne MCPis being called, and spot-check the source links at the end of the answer. - Optional: use the “Evaluate” tab for structured, repeatable test sets.
8 Publish and submit for approval
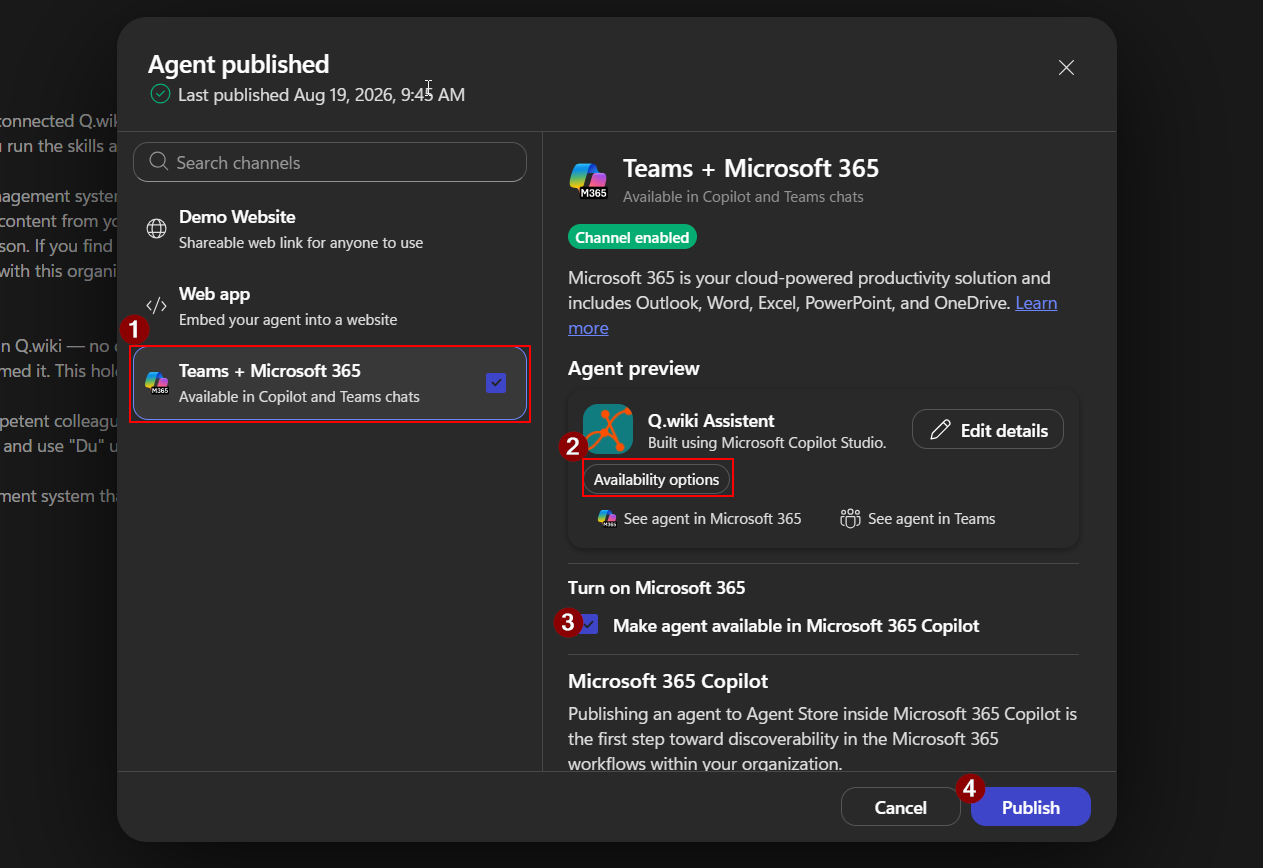
- Click “Publish” in the top-right corner and enable the “Teams + Microsoft 365” channel in the dialog (①).
- Under “Turn on Microsoft 365”, tick “Make agent available in Microsoft 365 Copilot” (③). Via “Edit details” you can add the store description, e.g. “Answers questions about our management system – straight from Ariadne, always with source links.”
- Confirm with “Publish” (④) – this can take a few minutes; it is not possible on a trial license.
- Then open “Availability options” (②) in the “Agent preview” > “Show to everyone in my org” > “Submit for admin approval” (may also read “Submit to org catalog”). Status: “Waiting for approval”.
- Let your Microsoft admin know – ideally with a link to part 2 .
Part 2: Approve and roll out (Microsoft admin)
From here your Microsoft admin takes over ( Global Administrator role) – this part works on its own.
9 Approve and deploy the agent
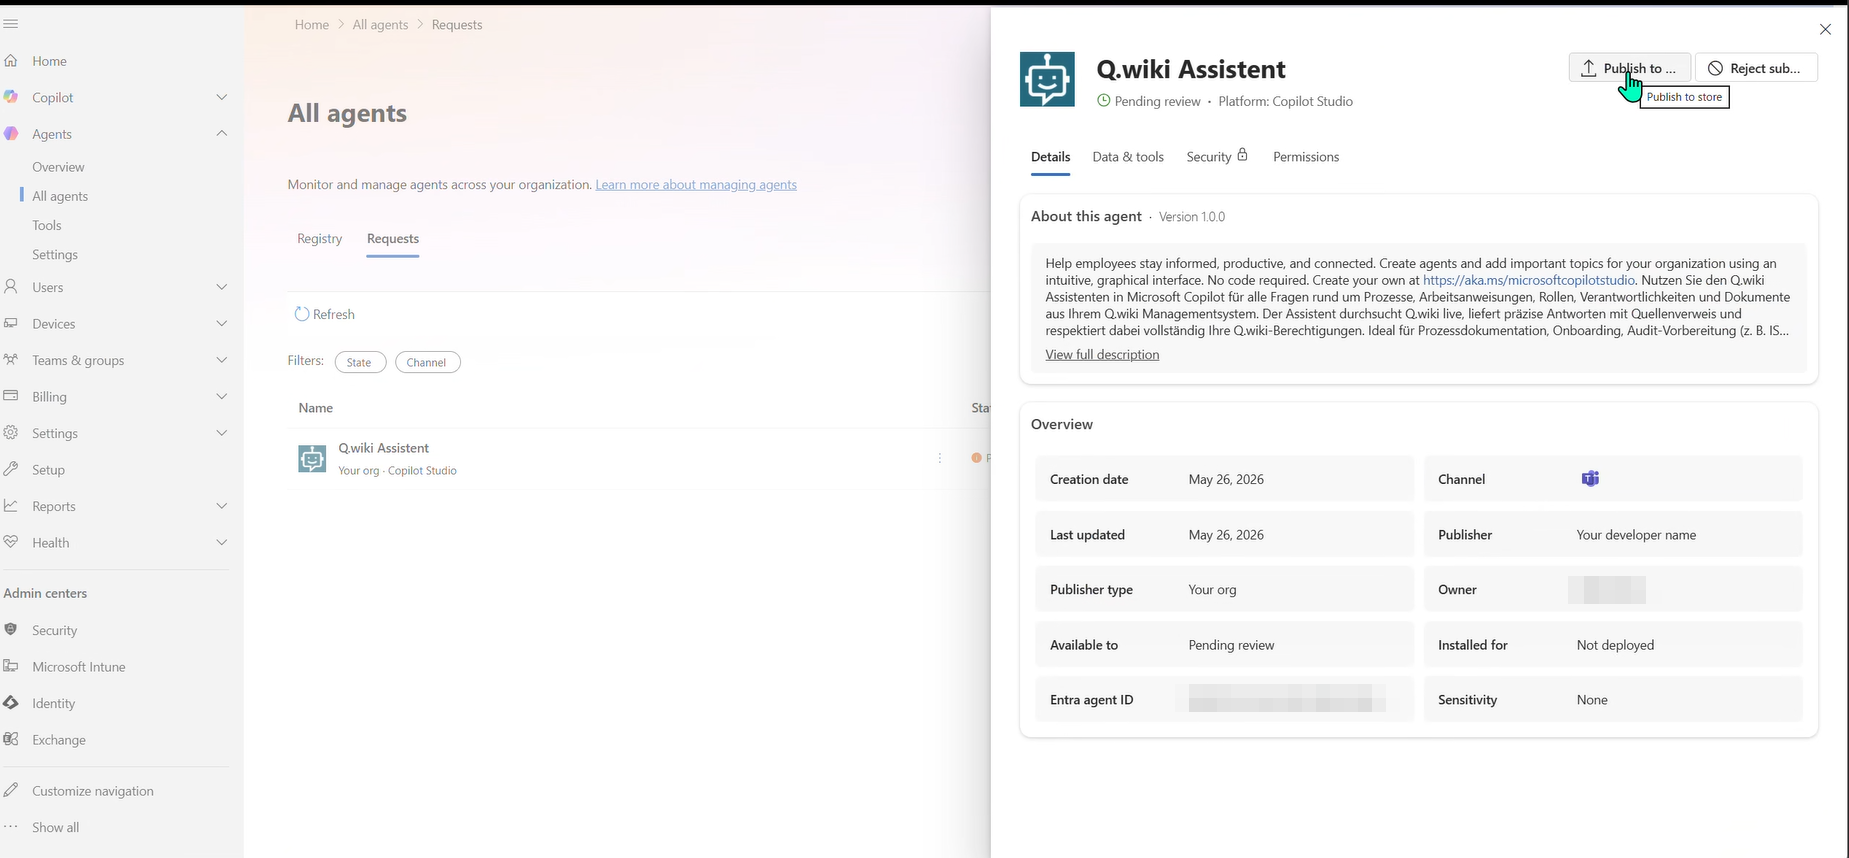
- Open admin.microsoft.com > Agents > All agents > “Requests” and select the Ariadne Assistant (“Pending review”); under “Data & tools” you can see the Ariadne MCP connection.
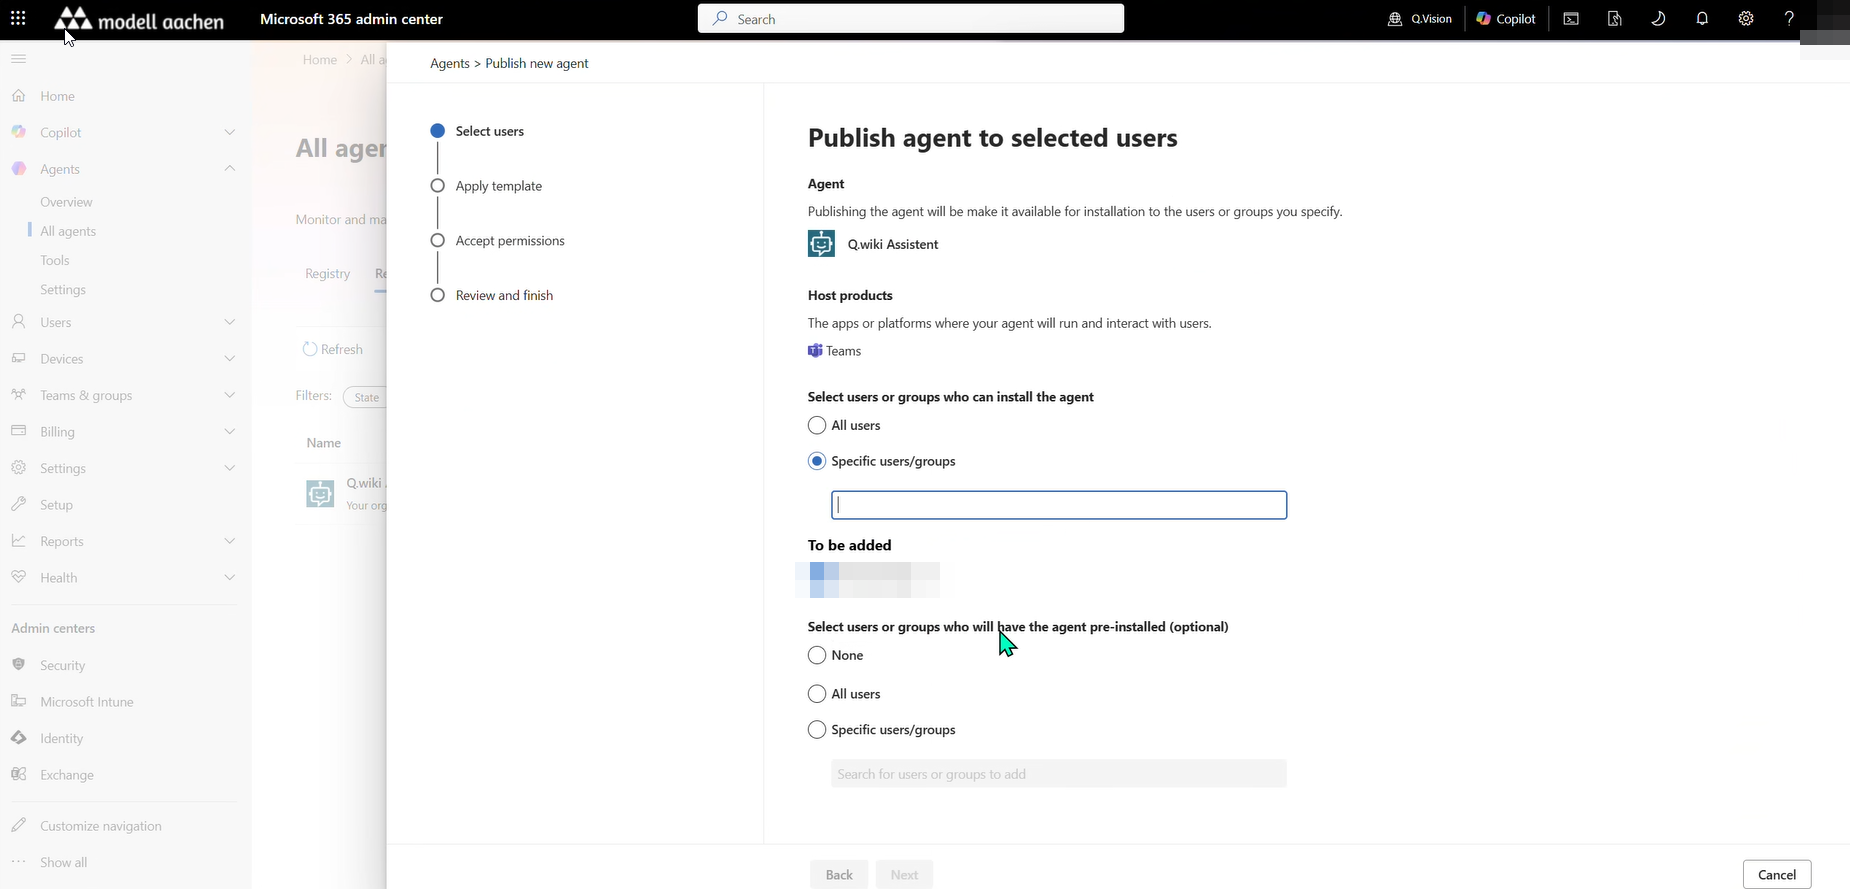
- Run “Publish to store” : audience (all or specific users/groups), pre-installation (recommended – otherwise users add the agent themselves from the store), policy template (the default is fine), review the permissions and grant “admin consent” .
- Finish with “Publish” – the agent appears in the store under “Built by your org” .
10 Pin the agent (optional, recommended)
Under Agents > All agents, click the published Ariadne Assistant – in the detail pane that opens you can pin it for all users directly in the left-hand Copilot navigation.
Note: The agent may appear twice in the list. Only one of the two entries can be pinned – use the one that offers the option
What it looks like for your users
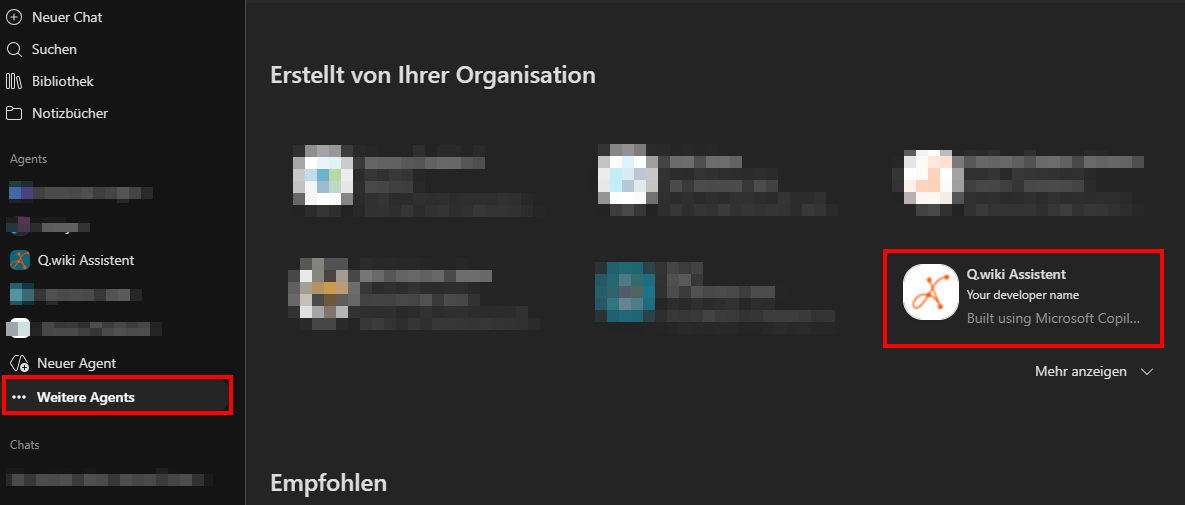
The Ariadne Assistant appears in Microsoft 365 Copilot and Microsoft Teams in the sidebar under “Agents” – pinned, or via “All agents” in the “Built by your org” section. The first time, users click “Connect” or “Sign in”, log in with their own Ariadne account and simply resend their question.
Licenses & costs
Does the agent consume credits even with a Microsoft 365 Copilot license? Yes, always. The new agents are billed on a usage basis via Copilot Credits (1 credit = 0.01 USD pay-as-you-go) – unlike classic agents, they are not covered by the Copilot license. The license is still useful: among other things, it covers the maker’s Copilot Studio access. Microsoft is moving this agent type to usage-based billing across the board – including previously created agents.
| Who | What they need |
|---|---|
| Maker | Copilot Studio access via a Microsoft 365 Copilot license , the free Copilot Studio User License (requires a prepaid credit pack) or the “Copilot Studio authors” security group. Trial: build and test yes, publish no. |
| End users | No Copilot license – just their own Ariadne account. |
| Tenant (admin) | Credits billing set up: pay-as-you-go meter (Power Platform admin center, with an Azure subscription) or prepaid (e.g. 25,000 credits for 200 USD/month) or a pre-purchase plan. |
- What is billed: building via chat, testing (Preview/Evaluate) and every use. Manual configuration (Build/Monitor) is free. Without credits, the agent stops (“You need credits to continue”).
- What does a request cost? Microsoft bills by effort, not per question: simple questions consume only a few credits (a matter of cents), elaborate multi-step tasks accordingly more. You will see the real consumption after the first few days in the Power Platform admin center – details in the Copilot Credits Guide in the attachments.
- Staying in control: allocate credits per environment and set monthly limits per agent (Power Platform admin center); spending policies and reports in the Microsoft 365 admin center under “Copilot” > “Cost management”.
Details: Usage-Based Billing and Cost Management for Copilot Credits | Microsoft Learn and Microsoft Learn: Usage-based billing .
FAQ
What is MCP – and what content does the agent see?
MCP (Model Context Protocol) is the standardized interface through which the agent accesses Ariadne live with every question – nothing is copied or indexed. It only sees the content the signed-in user is allowed to see in Ariadne, and it links its sources.
Why are the instructions in English?
That is what the models handle most reliably. The assistant still answers in the user’s language – German by default. You can add your own rules (e.g. tone of voice) at any time; republish once after making changes.
Which model should I choose – and how are models enabled?
The Ariadne Assistant works with any of the offered models. We recommend Claude Sonnet 5 because our skills were developed and tested with it – it is not mandatory. If external models (e.g. from Anthropic) are missing from the selection, your admin enables them once: in the Microsoft 365 admin center under “Copilot” > “Settings” > “AI providers operating as Microsoft subprocessors” activate the provider and allow users/groups; in the Power Platform admin center allow “Allow external models” and, if applicable, “Move data across regions” for the environment.
Which skills are included in the package?
| Skill | What it does |
|---|---|
ariadne-frage-beantworten | Answers questions about the management system from Ariadne content – with a source block (link, approval status, last updated). |
qwiki-prozessuebersicht-erstellen | Works out a process overview (2nd process level) in dialogue and delivers ready-to-paste HTML. |
qwiki-prozessbeschreibung-erstellen | Guides you through capturing a process like a consultant and delivers a finished process description as HTML. |
ariadne-arbeitsanweisung-erstellen | Guides you step by step to a finished work instruction as HTML. |
The package keeps evolving. If you're interested, please contact service@ariadne.io.
Do all users sign in through my connection?
No. Your connection from step 5 is only used for building and testing. Each user signs in with their own Ariadne account the first time (with enforced Entra ID/SSO automatically via the Microsoft login); the sign-in is valid for 30 days and is then requested again automatically.
Can I try the agent with a small group first?
Yes – in the “Availability options”, choose “Show to my teammates and shared users” instead of “Show to everyone in my org” and share it selectively. You can submit it to the whole organization at any time later.
What happens when I change the agent later?
Changes to instructions, model or skills only take effect after another “Publish” (step 8). Larger changes may appear to the admin as “Pending update” for re-approval.
Can I rename the agent later?
The display name, yes – any time.
How long until users see the agent?
Usually a few minutes. After approval and deployment, allow up to 24 hours; admin-pinned agents up to 6 hours.
Troubleshooting
| Problem | Solution |
|---|---|
| The “Optimize business processes” option is missing when creating an agent | Enable the “New experience” toggle; sign out and back in, or switch the environment. |
| The desired model is not selectable (e.g. Claude Sonnet 5) | Have your admin enable external models – path in the FAQ . |
| “You need credits to continue” / the agent stops responding | Check the credits billing, the environment allocation and the per-agent limits in the Power Platform admin center. |
| “Server URL not reachable” when adding the MCP server | Is the “API / MCP” module booked and active? Check the Ariadne name in the URL (My account > My profile > Content API). |
| OAuth sign-in fails | Allow pop-ups; sign in with the correct Ariadne account; recreate the connection. |
| The agent does not call the Ariadne tool | Check the “Activity trace”; hard-reload the browser (Ctrl+Shift+R); recreate the connection. |
| Answers seem incomplete | The agent only sees the Ariadne content of the signed-in user – check permissions. |
| “Submit for admin approval” is not visible | Publish first and enable the Microsoft 365 Copilot channel (step 8). |
| Skill upload fails | Upload the ZIP unchanged (do not unzip); if needed, request the current skill package from us. |
| The agent does not appear for users | Check steps 8–9; allow up to 24 hours (pins up to 6 hours). |
Related articles & links
- Ariadne MCP server – overview & endpoint
- MCP interface: use Ariadne knowledge with ChatGPT, Copilot & co.

Was this article helpful?
That’s Great!
Thank you for your feedback
Sorry! We couldn't be helpful
Thank you for your feedback
Feedback sent
We appreciate your effort and will try to fix the article